
The tutorial specifically covers the table configuration available in the <Body> section of the editor, where most article content is created and formatted. By mastering these feature and tutorials, you can ensure your table layouts are accurate, consistent, and ready for XML export.
1. Text Horizontal Align #
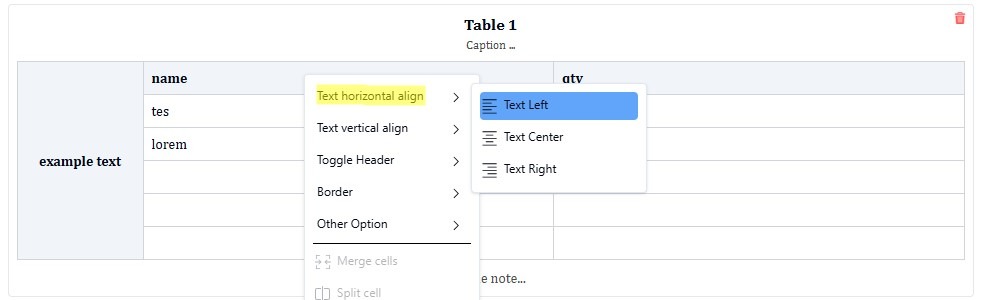
The “Text horizontal align” menu allows users to adjust the horizontal alignment of text inside table cells. It provides three options:
- Text Left: aligns text to the left side of the cell.
- Text Center: centers text within the cell.
- Text Right: aligns text to the right side of the cell.
This feature helps control the layout and readability of tables, making the presentation of data (such as names, numbers, or descriptions) more organized and visually clear.
2. Text Vertical Align #
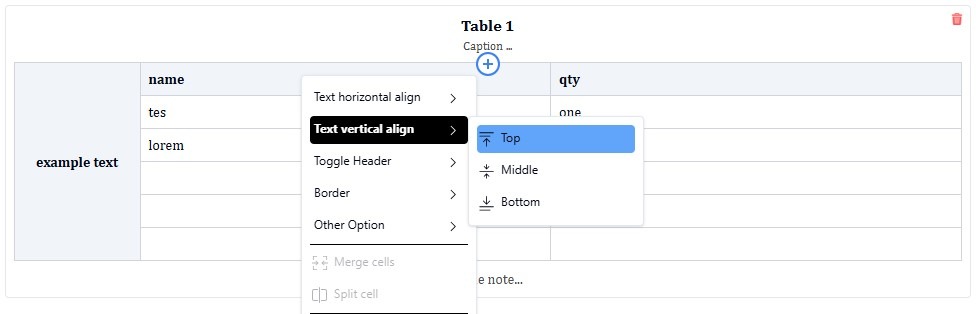
the Text vertical alignment tool in a table allows users to control the vertical positioning of text inside table cells. There are three options:
- Top: aligns text to the upper part of the cell.
- Middle: centers text vertically in the cell.
- Bottom: aligns text to the lower part of the cell.
This feature is useful for improving the visual balance of table content, especially when cells contain multiple lines of text or different element heights.
3. Toggle Header #
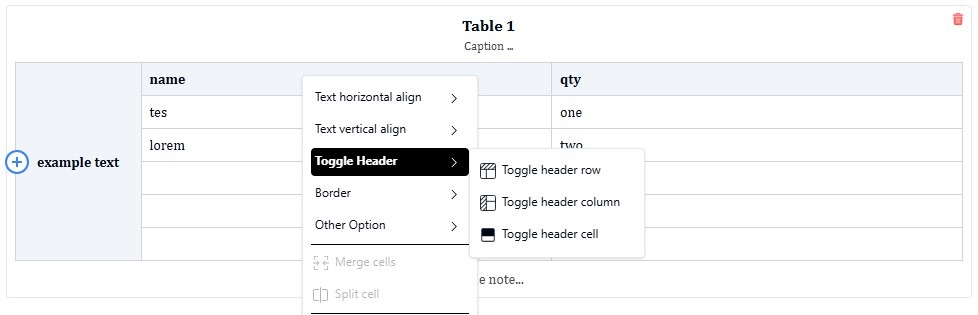
The feature shown is the Toggle Header option in the table settings.
It lets users define which parts of a table act as headers. There are three options:
- Toggle header row: sets or removes the top row as a header row (usually for column titles).
- Toggle header column: sets or removes the first column as a header column (usually for row titles).
- Toggle header cell: marks or unmarks a specific cell as a header cell.
This feature helps structure tables semantically and improves accessibility, ensuring header rows or columns are properly distinguished from regular data cells.
4. Border #
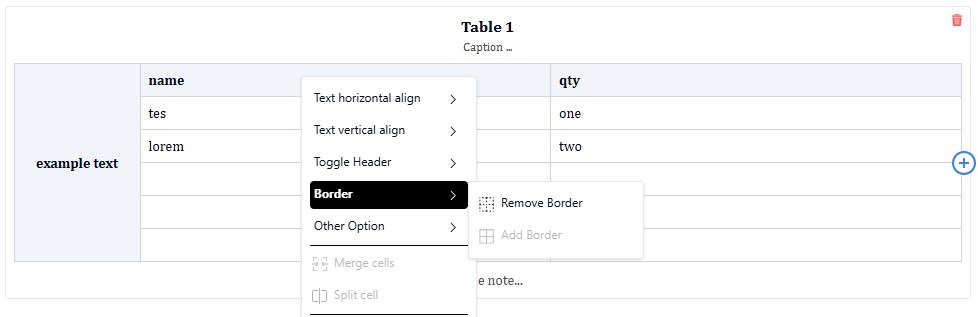
It allows users to control the visibility of table borders. The available actions are:
- Remove Border: hides the border lines around selected cells or the entire table.
- Add Border: restores or applies borders to the selected cells or table area.
How to Add Table #
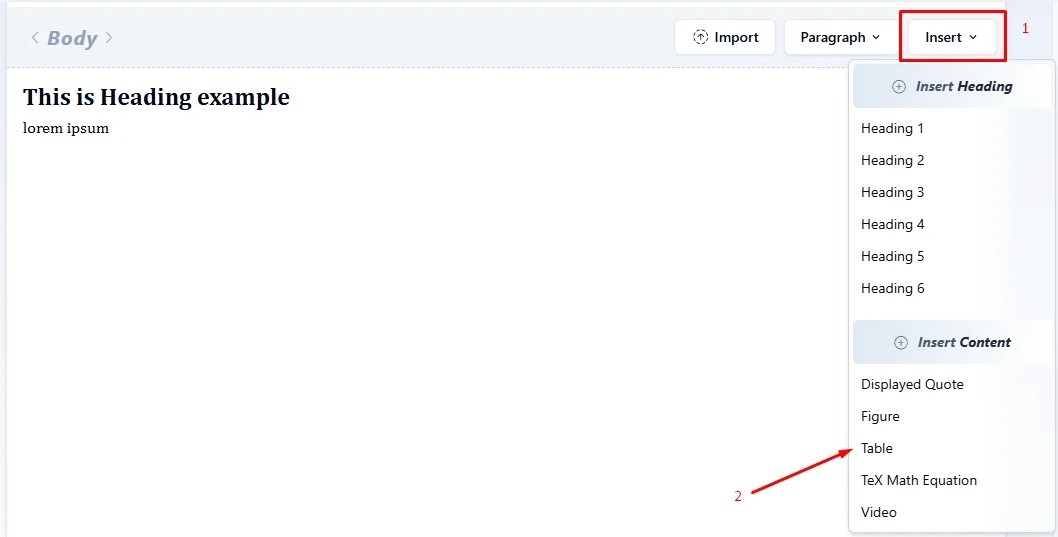
Place the cursor in the <Body section>, click Insert, then in the Insert Section, select Table.
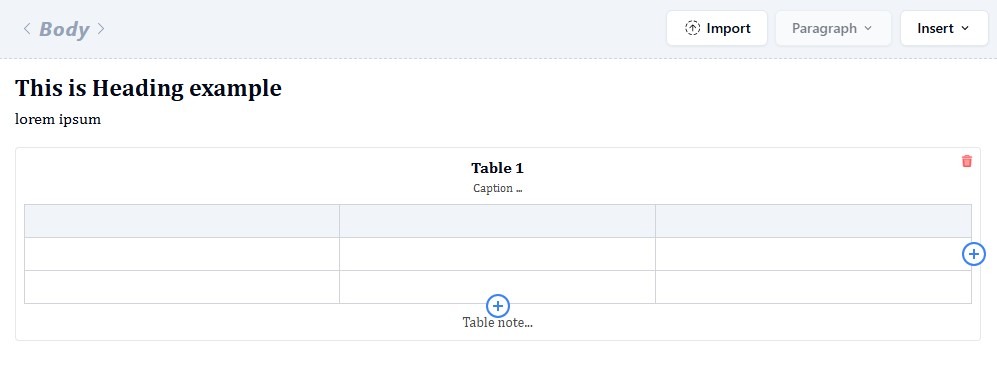
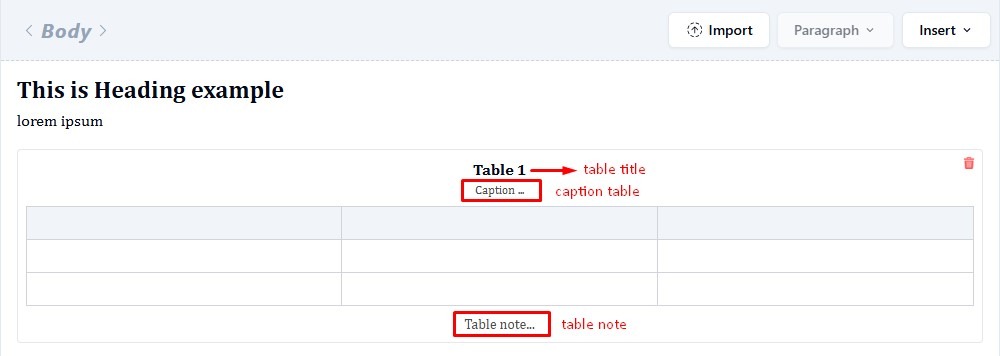
You can edit or remove a table title, caption table and table notes.
To add columns or rows to the table, click the ‘+’ icon on the side of each.
How to Move or Copy a Table From One Paragraph to Another #
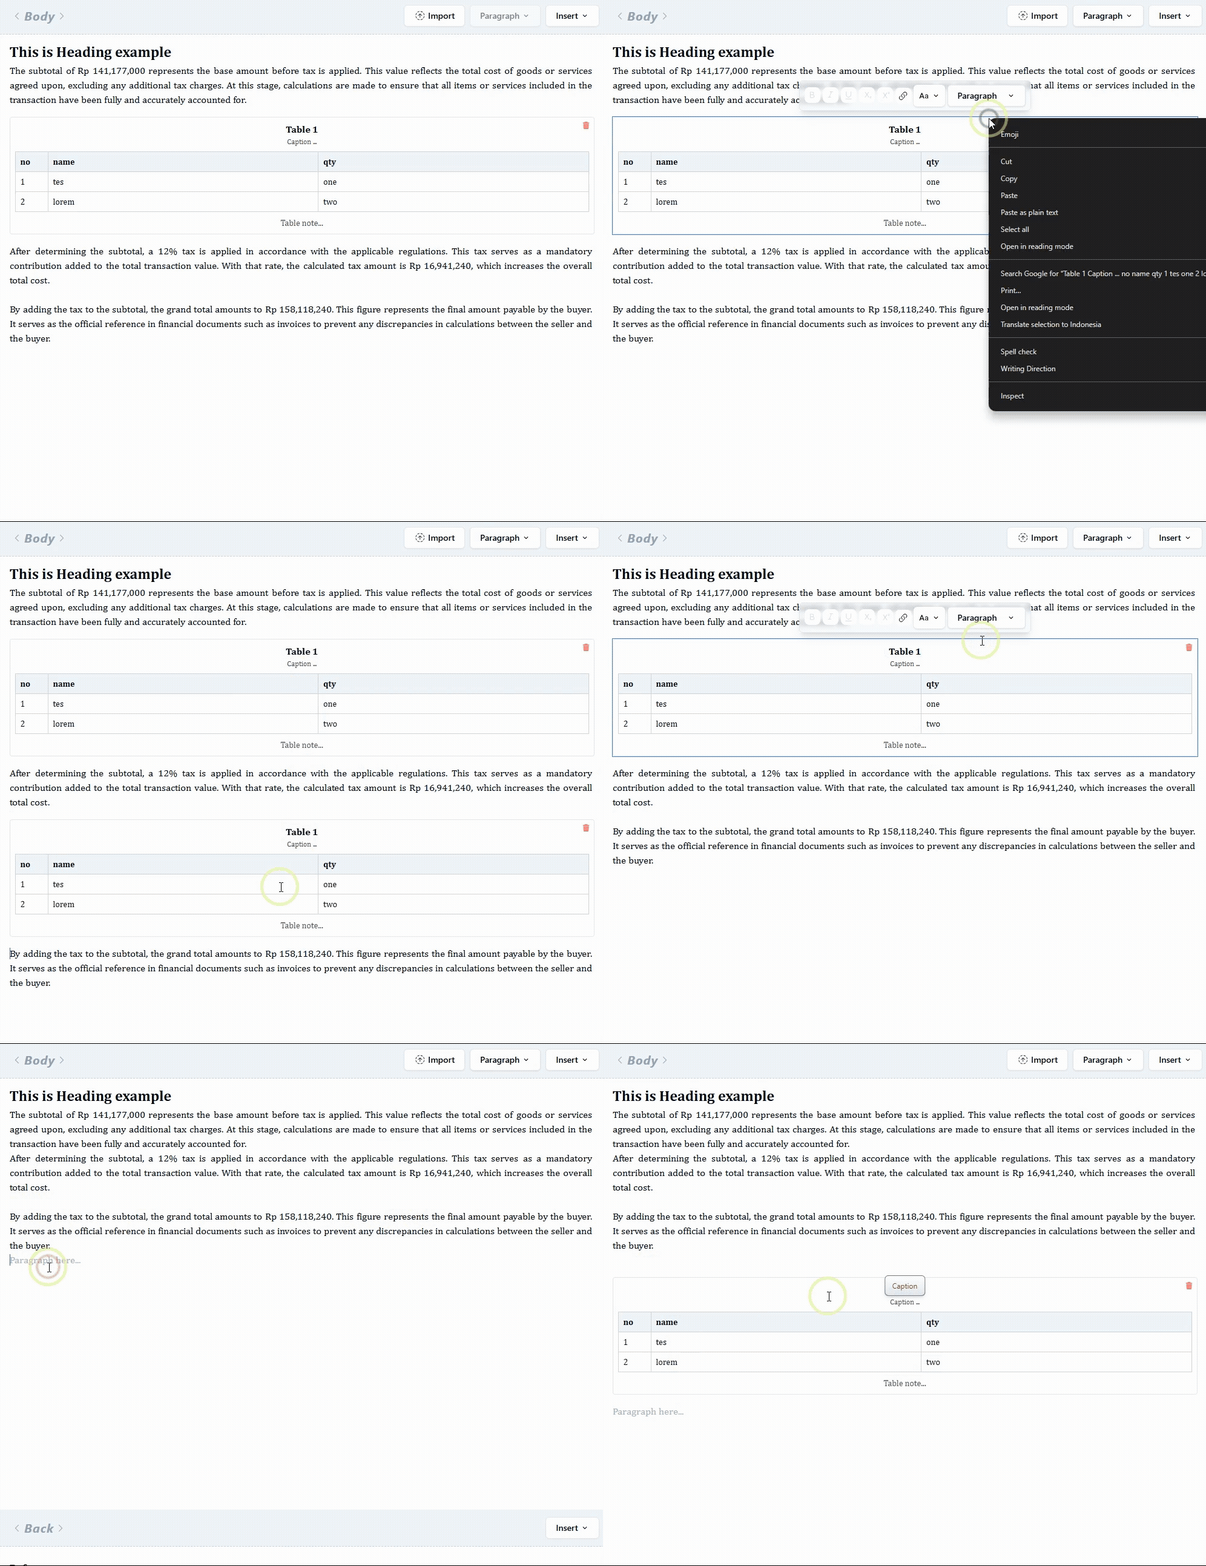
Click 3 times on the table you want to move, then cut the table with the Ctrl + x (to move) or Ctrl + c (to copy) shortcut, then paste the table in the paragraph where you want to place the figure.
How to Merge and Split Table #
Select the table you want to merge, then right-click and select Merge cells.
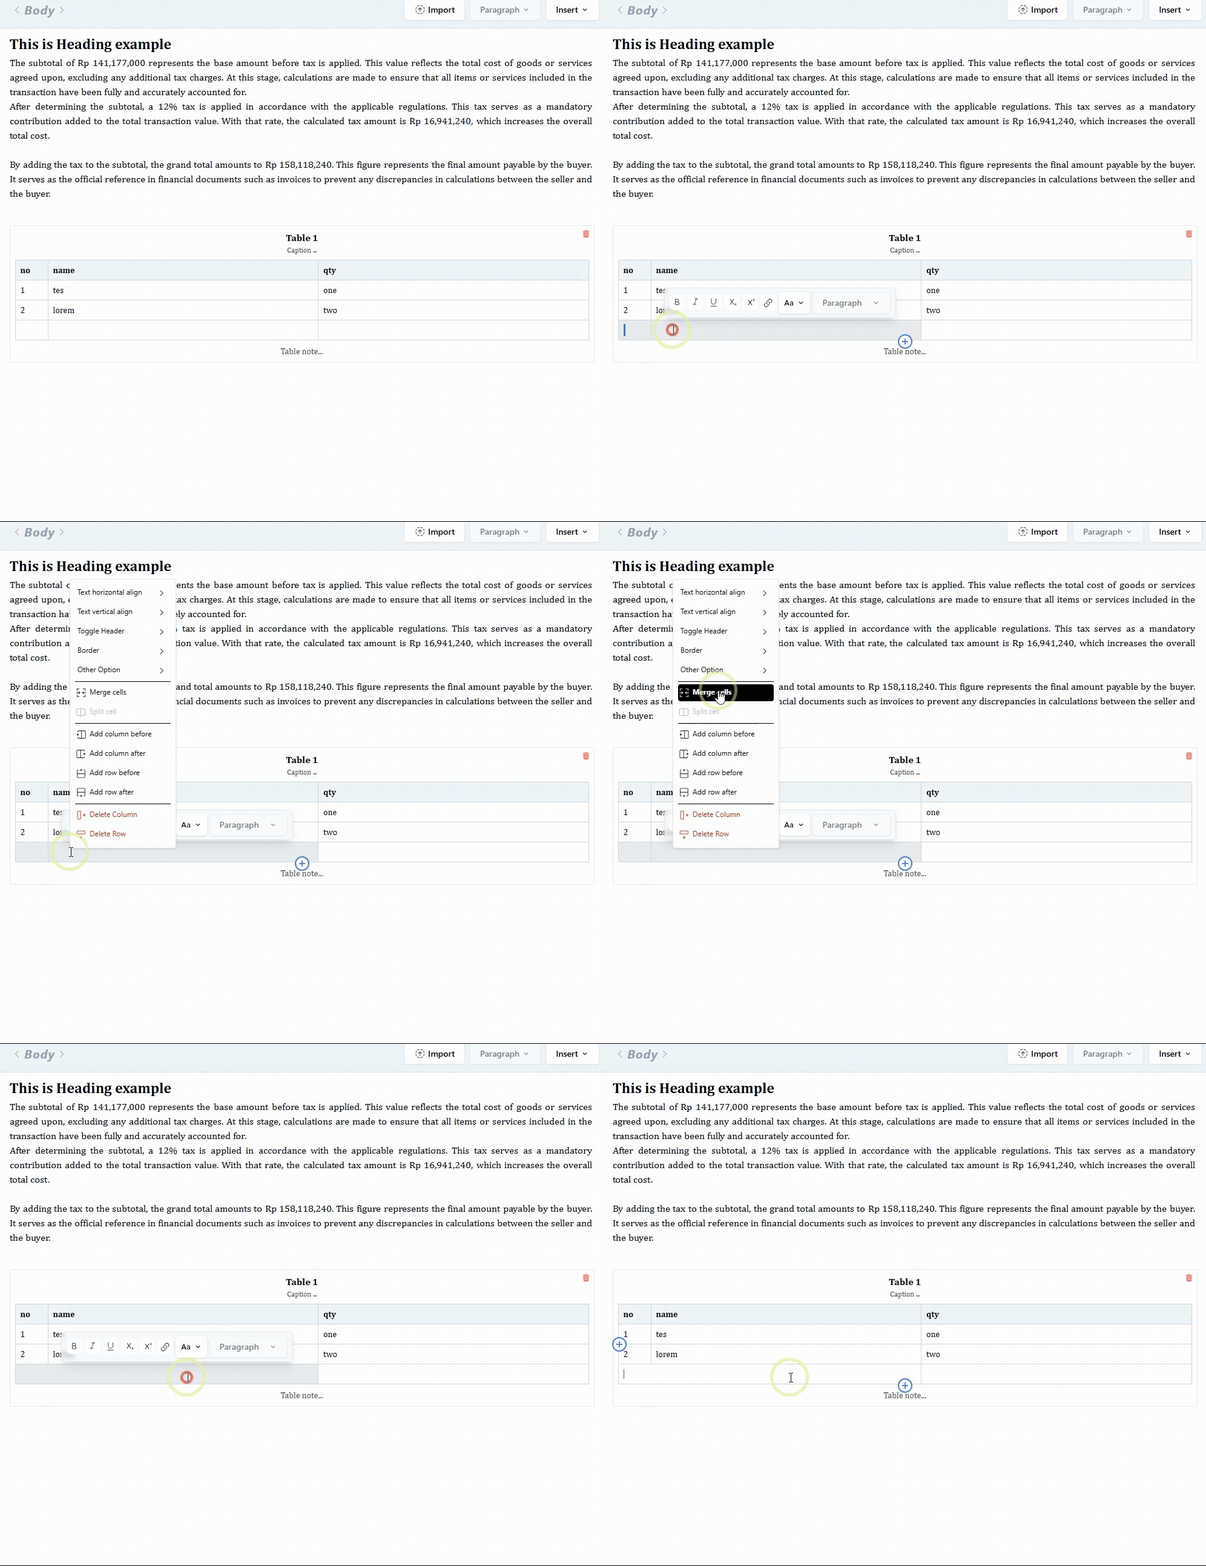
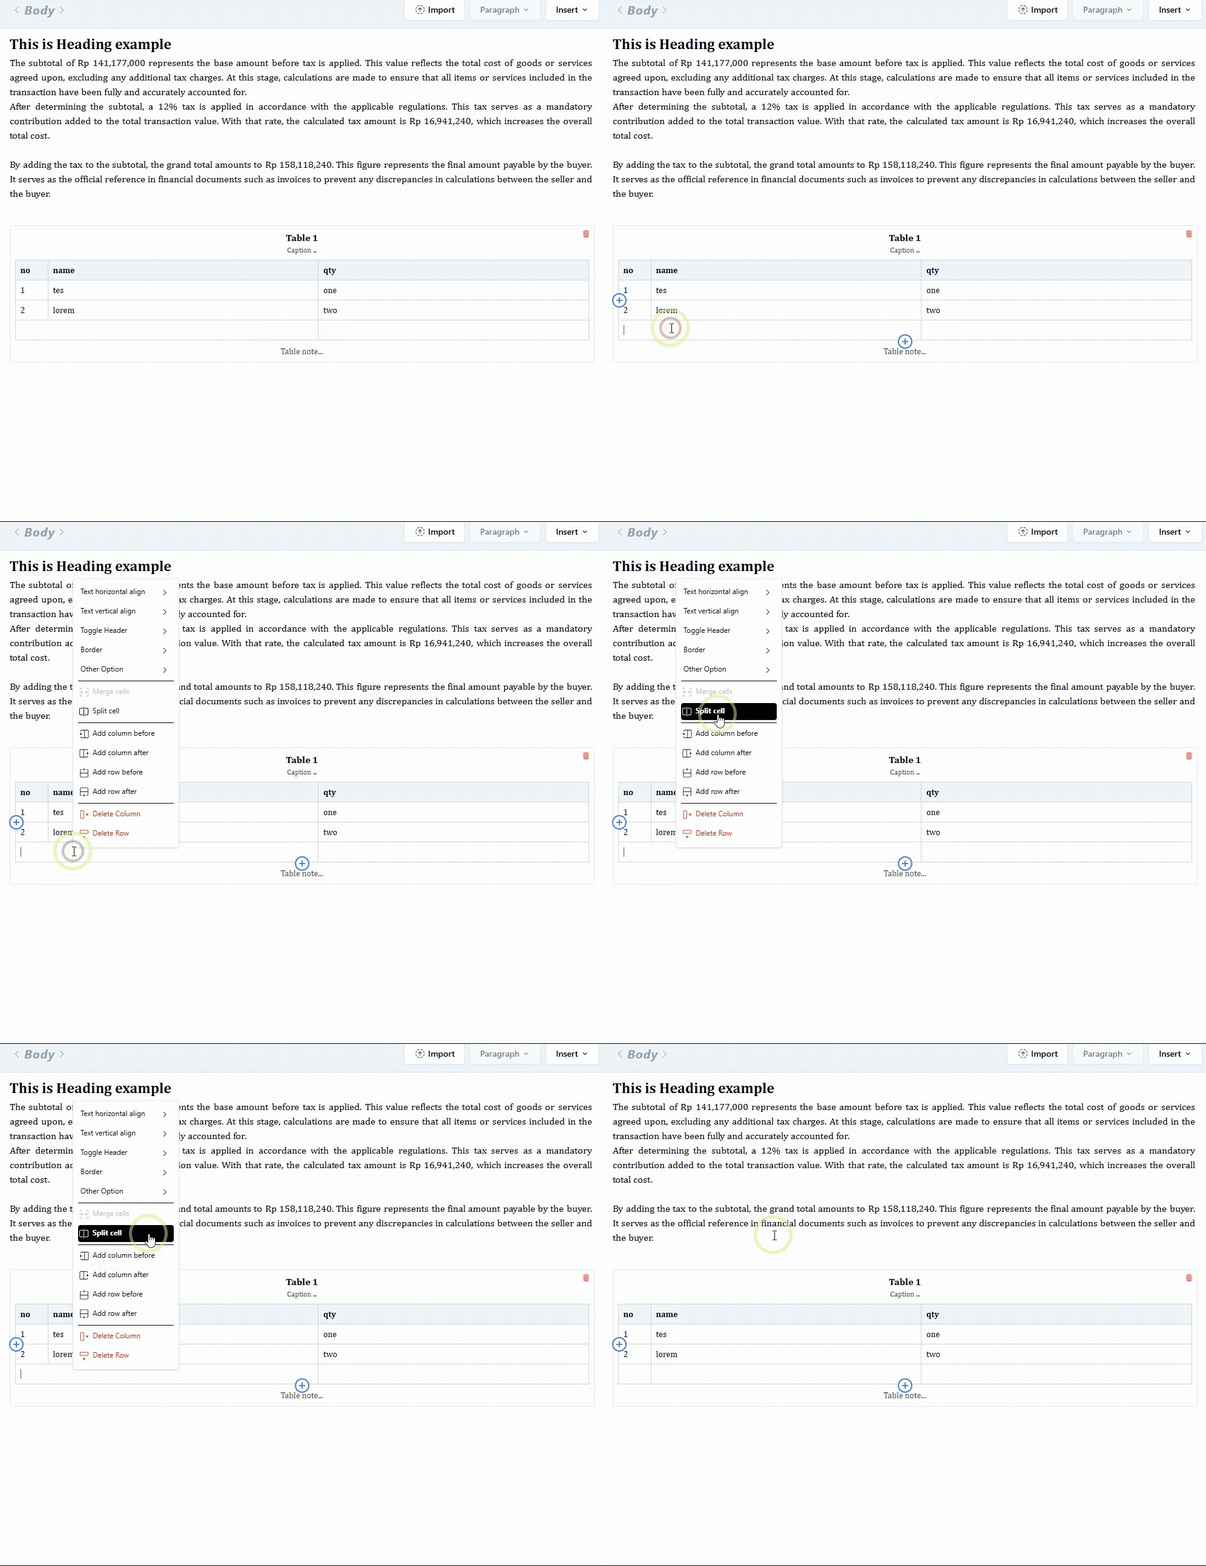
Right-click on the table you want to split, then select Split cell.
How to Change Text Direction and Rotate text in Table #
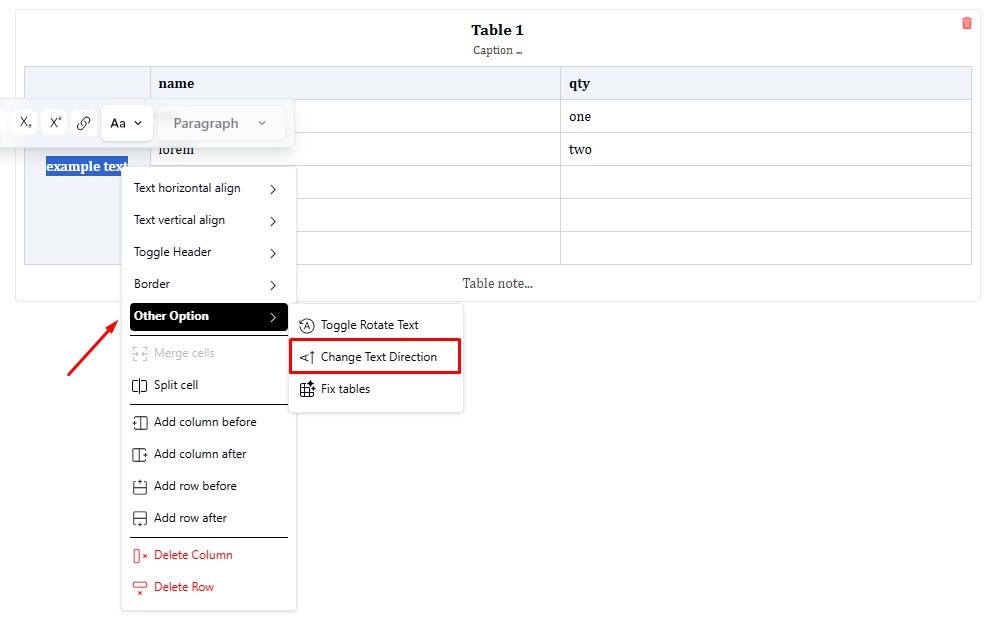
Select the text you want to rotate in the table, Right-click on the selected text. From the menu, go to Other Option → Change Text Direction.
You can also combine this with Toggle Rotate Text (found in the same menu) if you want to rotate the text vertically or at an angle.
How to Add Table in JATS Editor & PDF Layout #
1. Open the JATS tab.
Click Inspect to display the JATS tags in the document. Keeping Inspect enabled makes it easier to confirm that the figure has been recognized and tagged correctly.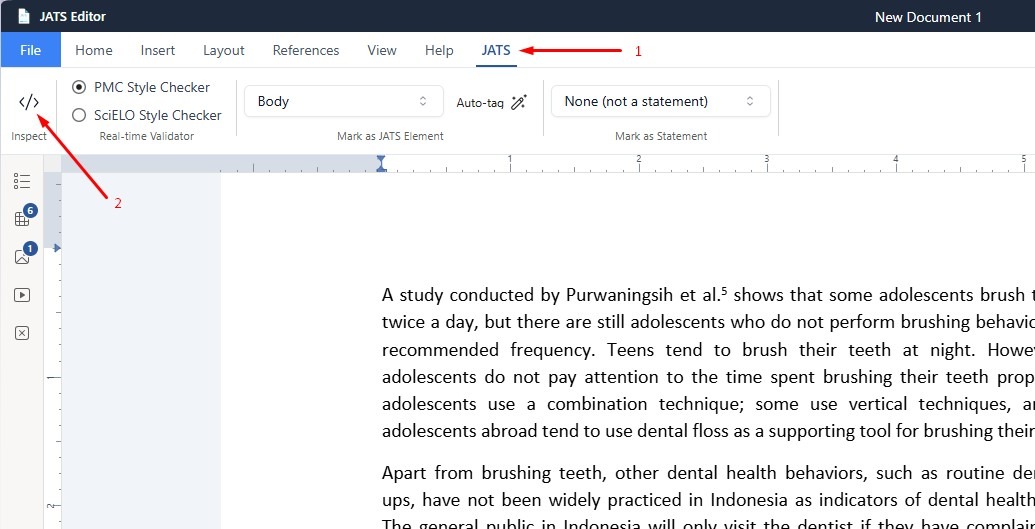
2. Open the Insert tab and click Table.
Select the number of rows and columns you need.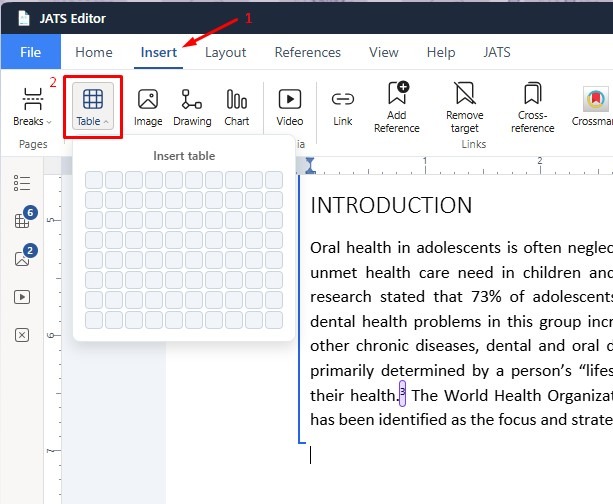
The table will be inserted into the document, enter the table content as required.
3. After the table has been inserted, you will see the Required Table JATS Data panel beside the table.
Click the Required Table JATS Data panel.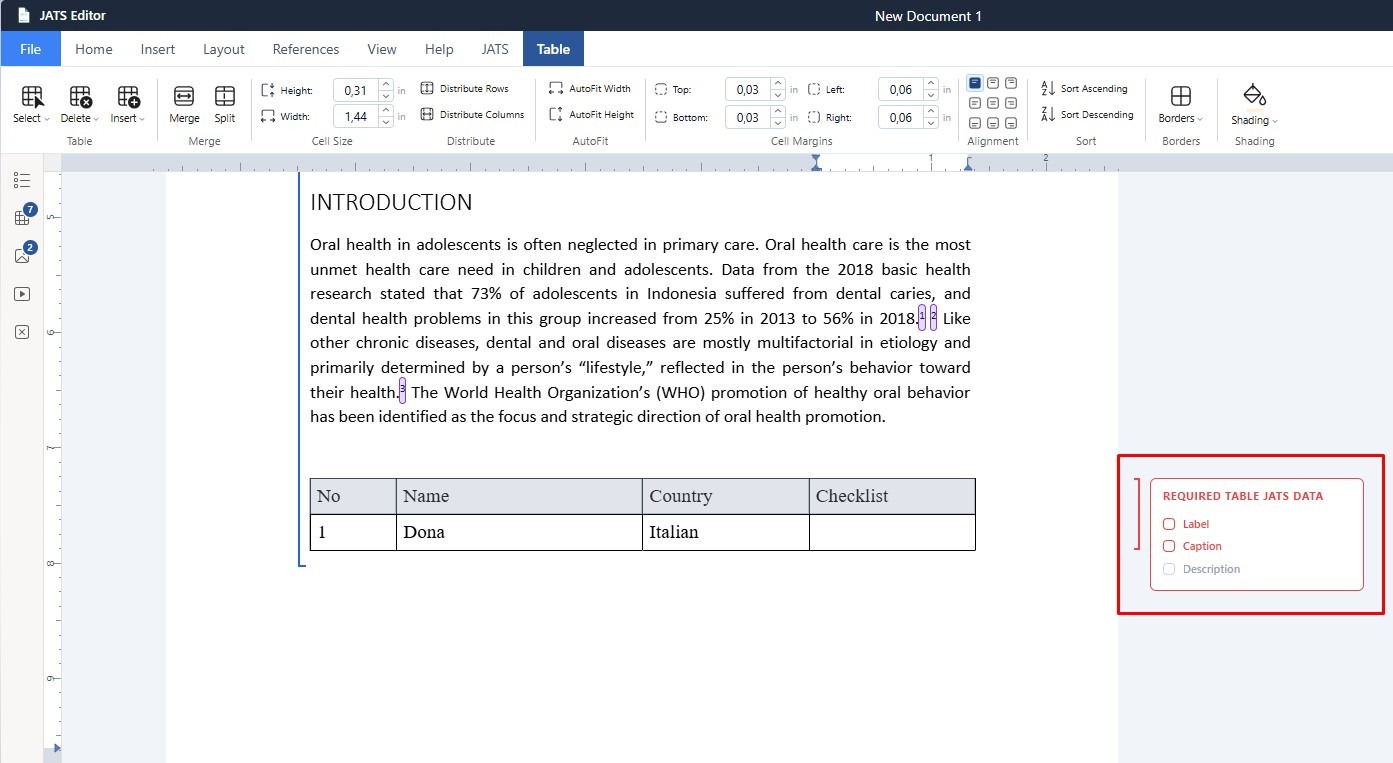
4. The Table Metadata window will appear.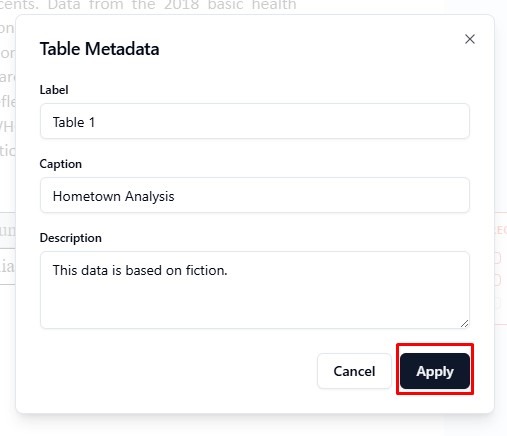
Complete the available metadata fields:
- Label – Enter the table number or identifier, for example, Table 1.
- Caption – Enter the title or caption of the table.
- Description – Add additional information or a short description of the table.
Click Apply.
4. Once the metadata has been applied, the required JATS data indicators will be marked as complete.
The label, caption, and description will also be associated with the table for JATS output.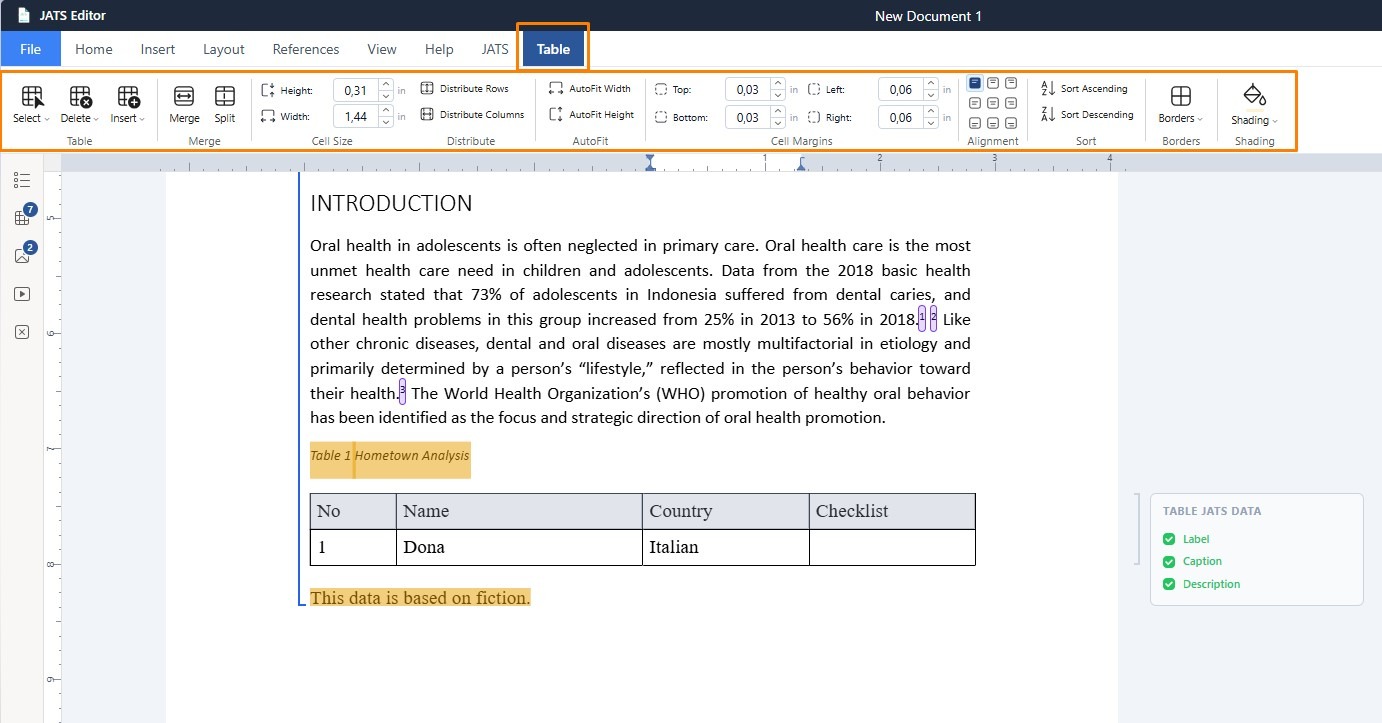
What If I Need to Modify the Table? #
If you need to change the table structure or appearance:
- Click inside the table you want to modify.
- The Table tab will automatically become available.
- Open the Table tab to access the table editing tools.
From this workspace, you can modify the table using features.
Complete the Required Table JATS Data for every table before exporting the document to JATS XML. This helps ensure that the table is correctly structured and identifiable in the final JATS document.


