
The JATS Editor Interface is designed to simplify the process of creating and managing JATS XML files directly within your workflow. This documentation provides an overview of the editor layout and its main components, helping users understand how each section contributes to building a complete and compliant XML structure for journal articles.
The editor create separated section about the content of the JATS, including:
- Front
- Body
- Back
Interface <Front> section #
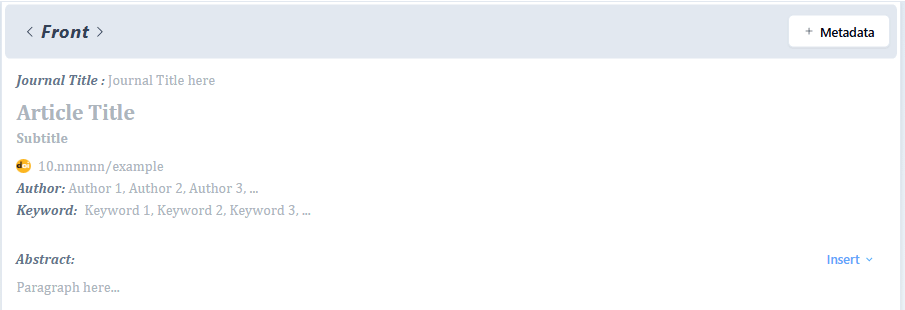
The front is where the data of general information or profile of the article is reside. It is including : Journal Title, Article Title, DOI, Keyword, Abstract, Author and their Affiliation.
When you are using OJS, this metadata automatically added in the editor without additional effort to complete the data in this section.
Interface <Body> section #

This section will hold information about the content of the article such as the main content of the research content, result and other information that is explain about the long information of the article.
The section in the content is divided by heading in the content.
 This feature is used to import the text documents. Supported file formats are
 .doc and .docx.
 This feature allows users to apply hierarchical text styles to structure document content. The dropdown menu provides predefined heading levels (Heading 1–Heading 6) and a standard text style (Paragraph).
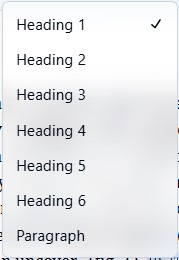
- Headings (1–6): Used to organize content by importance. Heading 1 represents the top-level title, while Heading 6 is the lowest-level subheading.
- Paragraph: Used for normal body text without heading formatting.
Selecting a style will automatically applies consistent font size and formatting based on the document you imported.
 This feature provides quick insertion options for structuring and enriching article content. It is divided into two sections:
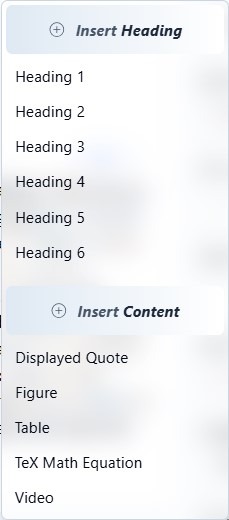
- Insert Heading: Adds hierarchical headings (Heading 1–Heading 6) to organize sections and subsections within the document.
- Insert Content: Adds specific content elements to the article, including:
- Displayed Quote – inserts a highlighted statement, typically used for interview excerpts, direct quotes, or emphasized remarks.
- Figure – adds an image or illustration with caption and description.
- Table – inserts a table for structured data or comparisons with caption and description.
- TeX Math Equation – adds mathematical formulas using LaTeX syntax.
- Video – embeds a video element with caption and description. Currently, only YouTube links are supported for embedding.
This menu helps users create well-structured, multimedia-rich articles directly within the editor.
Interface <Back> section #

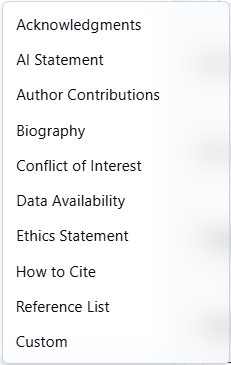
This section includes References and additional information. You can add some of the topics information in this section such as :
- Acknowledgments
- Biography
- Conflict of Interest
- Ethics Statement
- Author Contributions
- Data Availability
- References
Left Sidebar (Navigation Menu) #
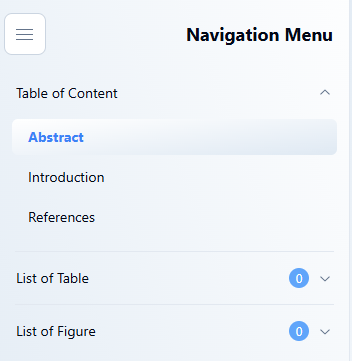
In the left sidebar you will see the list of content outline :
Right Sidebar (Reference List) #
The right sidebar consists of Contributors, Reference, and Warning
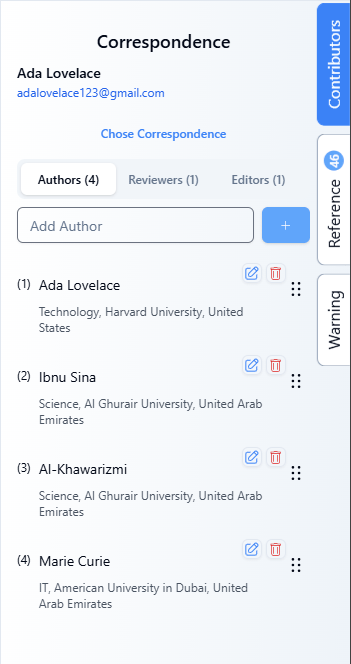
On the Contributors, you can view and manage the team behind the article, including authors, reviewers, and editors. Use this tab to edit their affiliations or add new contributors.
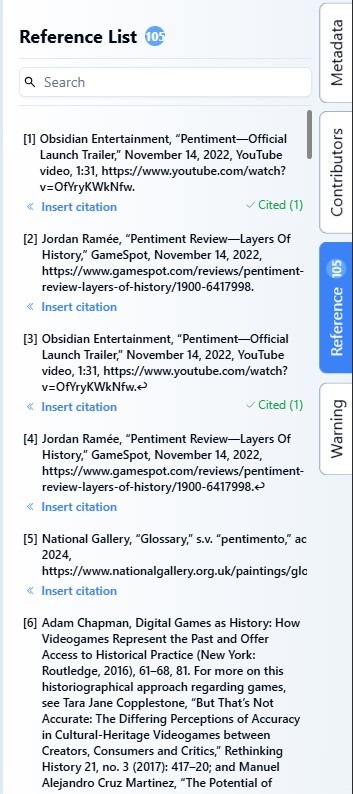
On the Reference list. This list is taken from the Back section in the Reference. There is no way you can modify each item in this area manually. The content added automatically once you add or paste any item in the Reference content in the Back section.
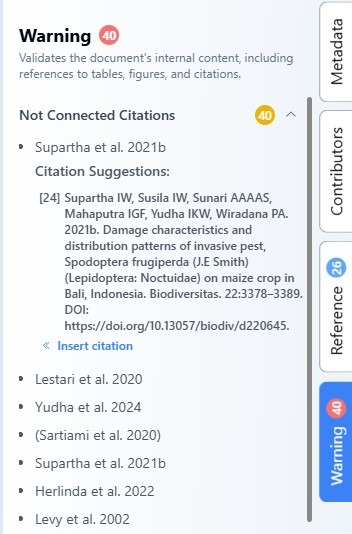
On the Warning, this feature helps you avoid reference errors in articles. This section will display citations that have not been linked to the Reference. Correct any errors to ensure the accuracy and credibility of your article.
Toolbar #

This toolbar provides text formatting controls to style and organize article content.
- B – Bold: Makes text bold for emphasis.
- I – Italic: Italicizes text, typically used for emphasis or scientific names.
- U – Underline: Adds an underline to selected text.
S– Strikethrough: Draws a line through text to indicate deletion or correction.- X₂ / X² – Subscript and Superscript: Used for formulas or mathematical notation (e.g., H₂O, x²).
- 🔗 (Link) – Inserts or edits a hyperlink.
- List icons – Create bulleted lists (•) or numbered lists (1., 2., 3.) to organize information clearly.
- Aa – Opens additional text formatting options such as font size or text style.
These options help users structure and format their content for readability and consistency.

- Save: Saves the current progress of the document to prevent data loss.
- Help: Opens a help menu containing information about available keyboard shortcuts and Markdown syntax supported by the editor.
- Theme Toggle: Switches between light mode and dark mode to match the user’s display preference.
(New Update) Overview of the Interface JATS Editor & PDF Layout #
Home Workspace #

The Home workspace provides the primary tools for editing and formatting document content. It allows users to modify text, organize paragraphs, and apply consistent formatting without switching to another menu.
Main Features #
Undo/Redo
Undo the most recent action or restore an action that was previously undone.
Clipboard
Cut, copy, and paste content, or copy formatting from one section of the document to another.
Font
Customize the appearance of text, including:
- Font type and size
- Bold, italic, and underline
- Superscript and subscript
- Text color and highlighting
- Clear text formatting
Paragraph
Manage paragraph structure and alignment, including:
- Text alignment
- Bulleted and numbered lists
- Indentation
- Line and paragraph spacing
- Borders and shading
- Text direction and paragraph positioning
Styles
Apply predefined styles such as Normal, No Spacing, Heading 1, and Heading 2. Using styles helps maintain consistent formatting and creates a clear document structure.
The Home workspace is recommended for general writing, editing, and document-formatting tasks.
Insert Workspace #

The Insert workspace provides tools for adding visual elements, references, media, mathematical content, and page components to a document.
Main Features #
Pages
Use Breaks to control the document structure by inserting page, section, or column breaks.
Tables
Insert tables to organize information into rows and columns.
Illustrations
Add visual content to improve the presentation of the document:
- Image – Insert an image from a file.
- Drawing – Create or add shapes and custom drawings.
- Chart – Present data using graphical charts.
Media
Insert video content into the document.
Links
Connect document content to other resources:
- Link – Add a hyperlink to a webpage, file, or document location.
- Cross-reference – Create a reference to another section, heading, figure, table, or item within the document.
- Crossmark – Add Crossmark information for verifying publication status and document updates.
Comments
Add comments for review, feedback, or collaboration without changing the main document content.
Equations and Symbols
Insert mathematical and scientific content:
- LaTeX – Create mathematical equations using LaTeX syntax.
- Symbol – Insert special characters and mathematical symbols.
Text
Add special text elements:
- Displayed Quote – Insert a quotation as a separate, emphasized block.
- Horizontal Line – Add a horizontal separator between sections.
Header and Footer
Add recurring information at the top or bottom of document pages, such as titles, author names, dates, or publication details.
Page Numbers
Insert and configure automatic page numbering throughout the document.
The Insert workspace is used whenever additional content or structural elements need to be added beyond standard text.
Layout Workspace #

The Layout workspace provides tools for controlling the page structure, document spacing, and page background. It is used to prepare a consistent and publication-ready document layout.
Main Features #
Page Setup
Configure the overall page structure:
- Margins – Adjust the spacing between the document content and the page edges.
- Orientation – Switch the page layout between portrait and landscape.
- Size – Select the required paper size.
- Columns – Arrange document content into one or multiple columns.
Paragraph
Control paragraph positioning and spacing:
- Indent Left – Set the distance between the paragraph and the left margin.
- Indent Right – Set the distance between the paragraph and the right margin.
- Space Before – Add spacing before the selected paragraph.
- Space After – Add spacing after the selected paragraph.
Page Background
Use Watermark to place text or an image behind the document content. Watermarks can be used to indicate document status, ownership, confidentiality, or branding.
The Layout workspace is recommended for adjusting the document’s page format, spacing, and visual structure before publication or export.
References Workspace #
The References workspace provides tools for adding footnotes, endnotes, citations, and references within the document. These features help organize supporting information and connect related document elements.
Main Features #
Footnotes
Add supplementary information or source details at the bottom of the current page.
- Insert Footnote – Add a numbered note at the bottom of the page.
- Next Footnote – Navigate to the next footnote or endnote in the document.
- Insert Endnote – Add a note that appears at the end of the document or section.
Citations
Create references between document content and related information:
- Cross-reference – Link text to another element within the document, such as a heading, table, figure, or section.
- Plain Text – Convert citation information as regular text without an active reference connection.
The References workspace is recommended for managing academic notes, supporting information, and internal document references.
References Workspace #
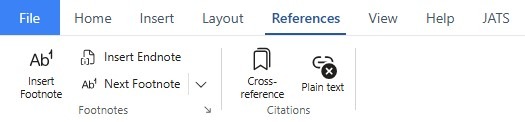
The References workspace provides tools for adding footnotes, endnotes, citations, and references within the document. These features help organize supporting information and connect related document elements.
Main Features #
Footnotes
Add supplementary information or source details at the bottom of the current page.
- Insert Footnote – Add a numbered note at the bottom of the page.
- Next Footnote – Navigate to the next footnote or endnote in the document.
- Insert Endnote – Add a note that appears at the end of the document or section.
Citations
Create references between document content and related information:
- Cross-reference – Link text to another element within the document, such as a heading, table, figure, or section.
- Plain Text – Convert or insert citation information as regular text without an active reference connection.
The References workspace is recommended for managing academic notes, supporting information, and internal document references.
View Workspace #
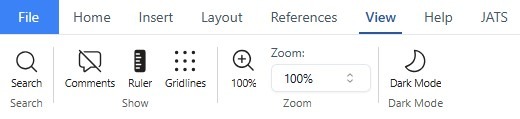
The View workspace provides tools for controlling how the document is displayed in the editor. These settings help users navigate, review, and work with document content more comfortably without changing the document itself.
Main Features #
Search
Find specific words, phrases, or content within the document.
Show
Control additional editing and navigation elements:
- Comments – Show or hide comments added to the document.
- Ruler – Display the ruler for adjusting margins, indentation, and tab positions.
- Gridlines – Show or hide visual gridlines to assist with content alignment.
Zoom
Adjust the document’s display size:
- 100% – Return the document to its default viewing scale.
- Zoom Level – Select or enter a custom zoom percentage.
Dark Mode
Switch the editor to a darker interface to reduce screen brightness and improve viewing comfort in low-light environments.
The View workspace changes only how the document appears in the editor and does not affect the document’s actual formatting or exported output.
JATS Workspace #

The JATS workspace is used to identify and tag document content according to the Journal Article Tag Suite (JATS) structure. It allows users to prepare JATS XML while continuing to edit the article and arrange its PDF layout in the same workspace.
Main Features #
Inspect
Open the inspection panel to view the JATS tags currently assigned to the document. This helps users review the article structure and confirm that each section has been tagged correctly.
Real-time Validator
Validate the document structure using the selected JATS publishing standard:
- PMC Style Checker – Checks the document against requirements commonly used for PubMed Central.
- SciELO Style Checker – Checks the document against SciELO publishing requirements.
Validation runs during the tagging process, helping users identify structural issues before exporting the article.
Mark as JATS Element
Assign the selected content to a main JATS article section:
- Abstract – Marks the article abstract.
- Body – Marks the main article content, such as the introduction, methods, results, and discussion.
- Reference – Marks the reference list or bibliography.
- Ignore JATS – Excludes the selected content from the generated JATS structure.
Auto-tag
Automatically detects and applies suitable JATS elements to selected content, reducing the amount of manual tagging required.
Mark as Statement
Identify publication statements and other supporting information, such as:
- Data Availability
- Ethics Statement
- How to Cite
- Biography
- etc.
- Custom Statement
Select None (not a statement) when the content is not part of a publication statement.
How to Tag Document Content #
- Select the complete content section, starting from the beginning of the first paragraph and ending at the final paragraph.
- Open the Mark as JATS Element menu.
- Choose the appropriate element, such as Abstract, Body, or Reference.
- For publication statements, use the Mark as Statement menu and select the relevant statement type.
- Use Inspect to review the applied tags and confirm the resulting JATS structure.
- Check the real-time validator for any structural warnings or errors.
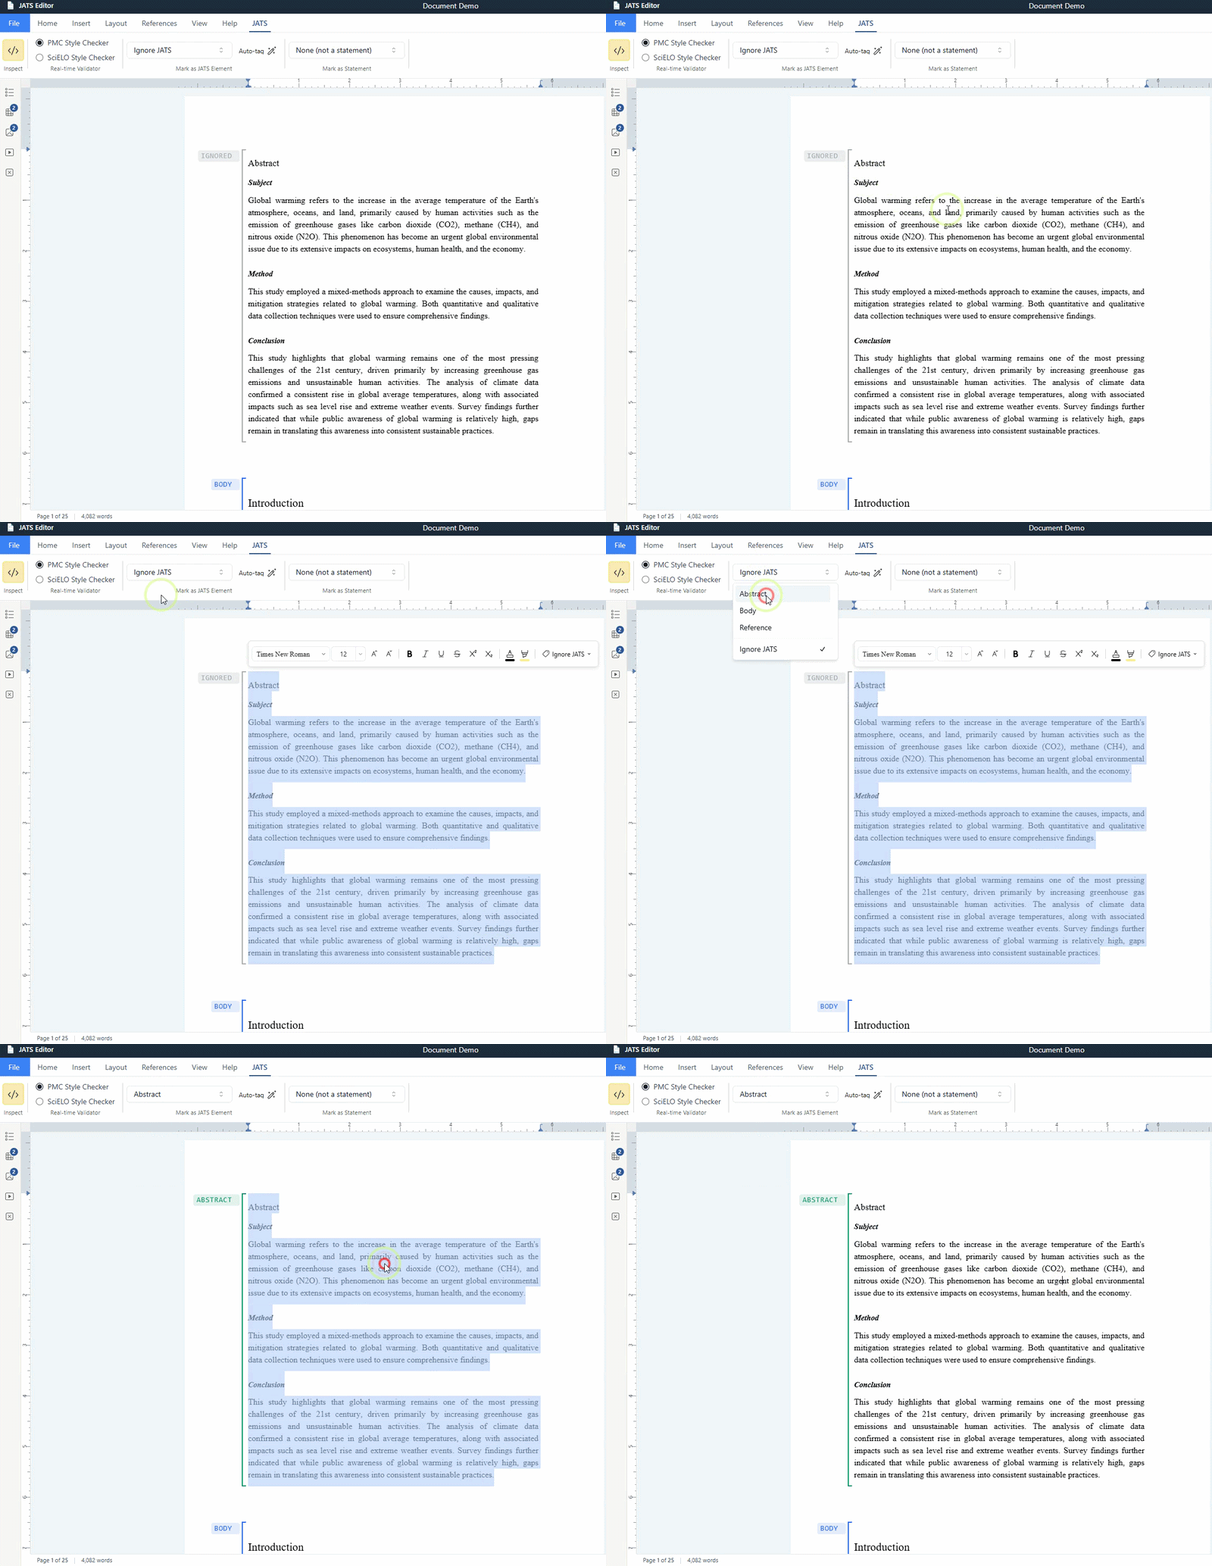
The JATS workspace supports a unified production workflow. Users can format the article for PDF publication while simultaneously tagging its content for JATS XML output.


